


 1519
1519
1. 设备树概念
1.1.设备树感性认识设
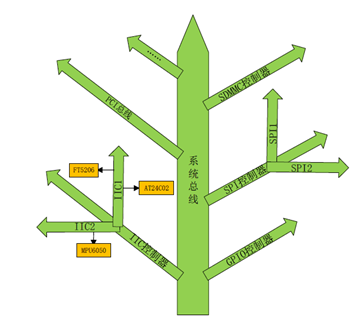
备树(Device Tree),将这个词分开就是“设备”和“树”,描述设备树的文件叫做DTS(Device Tree Source),这个DTS 文件采用树形结构描述板级设备,比如CPU 数量、 内存基地址、IIC 接口上接了哪些设备、SPI 接口上接了哪些设备等等。设备树是树形数据结构,具有描述系统中设备的节点。每个节点都有描述所代表设备特征的键值对。每个节点只有一个父节点,而根节点则没有父节点。
1.2.DTS、DTB、DTC
DTS:设备树源码文件;DTB:将DTS编译后得到的二进制文件;DTC:DTS的编译工具,其源码在内核的scriptsdtc目录下。基于同样arm架构的CPU有很多,同一个CPU会制作很多配置不一的板子,如何正确的编译所选的板子的DTS文件呢?在内核的arch/arm/boot/dts/Makefile中:
dtb-$(CONFIG_ARCH_XXX)?+=?xxx.dtb
dtb-$(CONFIG_ARCH_XXX)?+=?xxx-sip.dtb
dtb-$(CONFIG_ARCH_XXX)?+=?xxx.dtb
dtb-$(CONFIG_ARCH_XXX)?+=?xxx.dtb
例如xxxx的开发板,只要设置CONFIG_ARCH_xxx=y,所有用到这颗SOC的DTS都会编译成DTB。如果后续还用到了这颗SOC设计的开发板,只要新建一个DTS文件,并将对应名称的DTB文件名加到dtb-$(CONFIG_ARCH_xxx)中,在编译设备树时就会将DTS编译为二进制的DTB文件。
1.3.Device Tree语法
以下语法分析均以xxx.dts为例。
1.3.1. dtsi头文件
设备树的头文件扩展名为 .dtsi。以xxx.dts为例,其包含以下头文件。
#include?"skeleton.dtsi"
#include?xxx.h"
#include?"xxx-clocks.dtsi"
#include?"xxx-pinctrl.dtsi"
#include?"xxx-camera.dtsi"
需要注意的是.dts文件不但可以引用.dtsi文件,还可以引用.h文件和其他的.dts文件。Q1:每一个.dtsi和.dts都有自己的根节点,但是一个设备树文件只允许有一个根节点,DTC如何处理?将根节点合并,保留最后一级的根节点。包含的头文件内容会被展开,展开的位置在/memory和/cpus之间。(存疑,只用xxx.dts编译过)Q2:如果包含过程中有重复的compatible,DTC怎么处理?编译时不会报错,会生成两个compatible属性一样的节点。
1.3.2. 设备节点
设备树中的每一个节点都按照以下格式命名:
node-name@unit-address
node-name表示节点名称,它的长度范围应该是1~31个字符,可以由以下的字符组成:
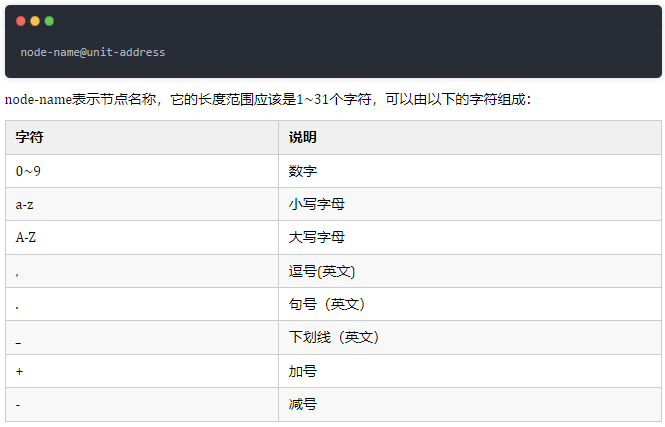
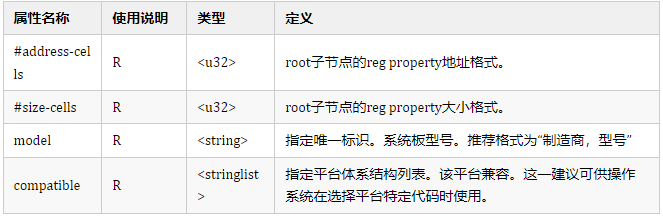
表 2-1节点名称的有效字符
节点名称应以较低或大写字符开头,并应描述设备的一般类别。节点的单位地址特定于节点所在的总线类型。它由表2-1中字符集中的一个或多个ASCII字符组成。单位地址必须与节点的reg属性中指定的第一个地址匹配。如果节点没有reg属性,则必须省略@unit-address,并且单独使用节点名称将节点与树中相同级别的其他节点区分开来。对于reg格式和单位地址,特定总线的绑定可能会指定附加更具体的要求。根节点没有节点名称或单位地址。它由正斜杠(/)标识。
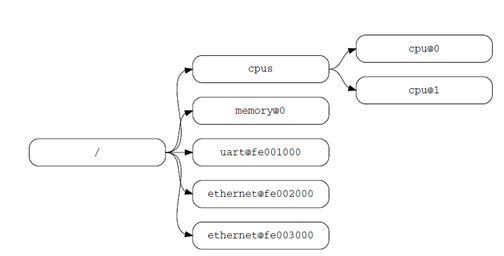
图 2-1节点名称示例
在图2-1中,节点名称为cpu的两个节点通过uint-address 0和1区分;节点名称为ethernet的两个节点通过uint-address fe002000和fe003000区分。在设备树中经常会看到以下设备名称:
watchdog:?watchdog@04009800
冒号前的是节点标签(label),冒号后是节点名称。引入label的目的是方便访问节点,可以直接通过&label来访问这个节点。比如上述节点就可以使用&watchdog来访问。
1.3.2.1. 通用名称建议
节点的名称应该有些通用,反映设备的功能,而不是其精确的编程模型。如适用,名称应为以下选择之一:
??adc??????accelerometer
??atm??????audio-codec
??audio-controller???backlight:
??bluetooth?????bus
??cache-controller???camera
??can??????charger
??clock:?????clock-controller
??compact-flash????cpu
??cpus??????crypto
??disk??????display
??dma-controller???dsp
??eeprom?????efuse:
??mdio??????memory
??memory-controller???mmc
??mmc-slot?????mouse
??nand-controller???nvram
??oscillator????parallel
??pc-card?????pci
??pcie??????phy
??pinctrl?????pmic
??pmu??????port
??ports??????pwm
1.3.2.2. 路径名称
通过指定从根节点到所需节点的完整路径(通过所有子节点),可以唯一识别devicetree中的节点。指定设备路径的约定是:
/node-name-1/node-name-2/.../node-name-N
例如,在图2-1中,到cpu#1的设备路径为:
/cpus/cpu@1
/为根节点,在保证完整路径明确的前提下,可以省略uint-address。
1.3.3. 属性
设备树中的每个节点都有描述节点特性的属性。属性由名称和值组成。
1.3.3.1. 属性名称
属性名称的长度范围应该是1~31个字符,可以由以下的字符组成:

非标准属性名称应指定唯一的字符串前缀,例如股票代号,用于标识定义该属性的公司或组织的名称。示例:
xxx,pin-function?=?<6>;
fsl,channel-fifo-len
linux,network-index
ibm,ppc-interrupt-server#s
1.3.3.2. 属性值
属性值是包含与属性关联的信息的零或多个字节的数组。
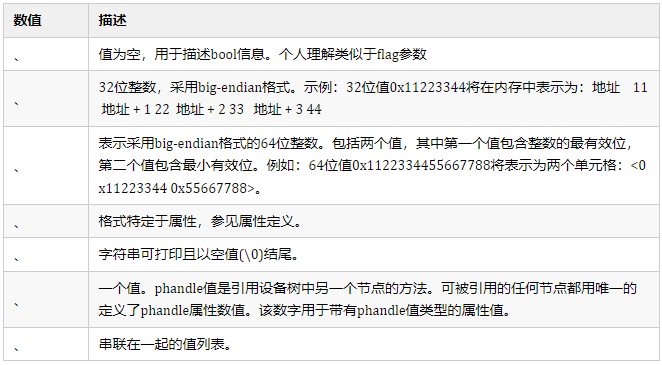
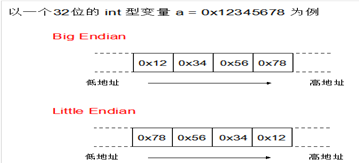
big-endian和little-endian(大小端):big-endian:是指低地址端存放高位字节;little-endian:是指低地址端存放低位字节;
1.3.3.3. 标准属性
Compatible(兼容)

示例:
compatible?=“fsl,mpc8641”,“ns16550”;
在此示例中,操作系统将首先尝试查找支持fsl,mpc8641-uartmpc8641的设备驱动程序。如果找不到驱动程序,然后,它将尝试定位受支持的更通用的ns16550设备类型驱动程序 。
一般驱动程序文件都会有个OF匹配表,此匹配表保存着一些compatible值,如果设备节点的 compatible属性值和OF匹配表中的任何一个值相等,那么就表示设备可以使用这驱动。比如在文件drvier/misc/memctrl.c中:
static?struct?of_device_id_xxx_memctrl_of_match[]?=?{
{?.compatible?=?"xxxx,memctrl",?},
{},
};
对应的,在arch/arm/boot/dts/xxx.dts中有:
memctrl:?memctrl?{
compatible?=?"xxxx,memctrl";
reg?=?<0x0121B000?0x1044>;
clocks?=?<&sdram_bandw_clk>,?<&mem_axi_clk>;
clock-names?=?"sdram_bandwidth_clk",?"mem_axi_clk";
interrupts?=?<GIC_SPI?INT_SDRAM?IRQ_TYPE_LEVEL_HIGH>;
interrupt-controller;
#interrupt-cells?=?<1>;
};
Model(型号)

示例:
model =“fsl,MPC8349EMITX”;
Phandle(pointer handle)

示例:
pic@10000000?{
phandle?=?<1>;
interrupt-controller;
};
定义了1的phandle值。另一个设备节点可以引用phandle值为1的pic节点:
another-device-node?{
interrupt-parent?=?<1>;
};
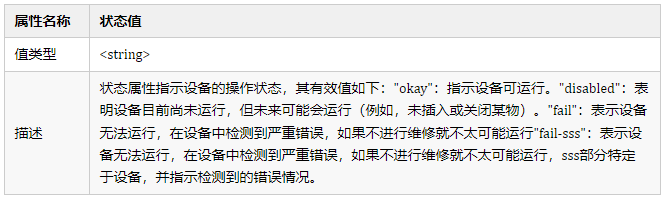
Status
#address-cells and #size-cells
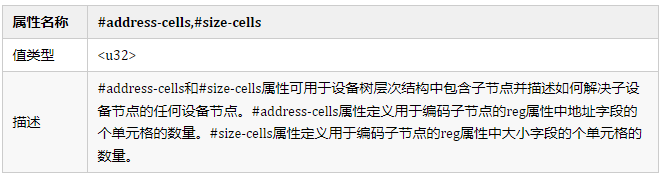
#address-cells?=?<1>;
#size-cells?=?<0>;
表示reg属性中有一个u32表示address,没有表示reg大小的数据,所以:reg = <0x0>; 即reg的起始地址为0x0,不描述其大小
#address-cells?=?<1>;
#size-cells?=?<1>;
表示reg属性中有一个u32表示address,有一个u32表示size,所以:reg = <0x00000000 0x00040000>; 即reg的起始地址为0x00000000,大小是0x00040000
Reg
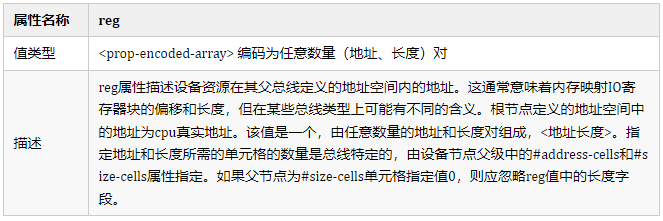
示例:假设系统芯片中的设备包含两个寄存器块,SOC中偏移0x3000的32字节块和偏移0xFE00的256字节块。reg属性的编码如下(假设#address-cells和#size-cells值为1):
reg=<0x3000?0x20?0xFE00?0x100>;
virtual-reg

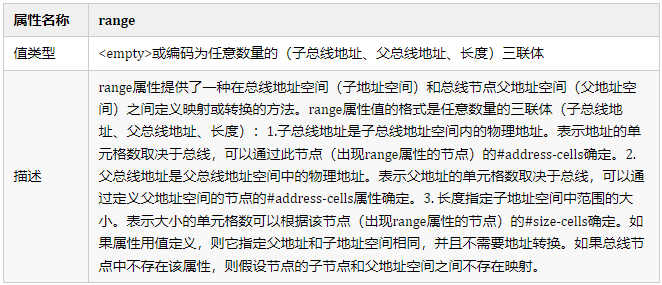
range
示例:
soc?{
compatible?=?"simple-bus";
#address-cells?=?<1>;
#size-cells?=?<1>;
ranges?=?<0x0?0xe0000000?0x00100000>;
serial?{
device_type?=?"serial";
compatible?=?"ns16550";
reg?=?<0x4600?0x100>;
clock-frequency?=?<0>;
interrupts?=?<0xA?0x8>;
interrupt-parent?=?<&ipic>;
};
};
soc节点指定了<0x0 0xe0000000 0x00100000>;此属性值指定对于1024KB范围的地址空间,在物理0x0处寻址的子节点映射到物理0xe0000000的父地址。通过这种映射,串行设备节点可以通过0xe0004600地址的加载或存储、0x4600(在注册表中指定)的偏移量以及范围中指定的0xe0000000映射寻址。
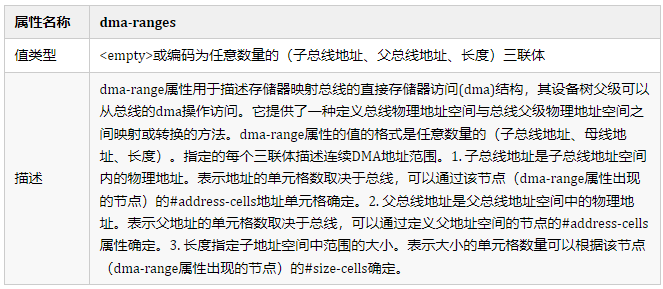
dma-range
Name(已弃用)

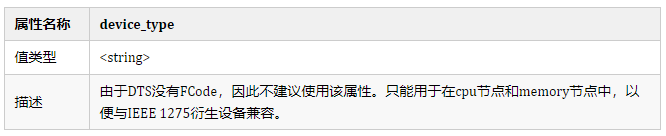
device_type
1.3.4. 基本设备节点
类型所有设备树文件均要包含一个根文件,并且所有设备树文件均应在根节点下存在以下节点:
- 1个/cpus节点
- 至少一个/memory节点
使用说明:R = 必需,O = 可选,OR = 可选但推荐,SD = 参见定义,所有其他的标准属性均可接受,但可选
1.3.4.1. Root node
devicetree有一个单独的根节点,所有其他设备节点都是它的后代。根节点的完整路径为/。
1.3.4.2. /aliases节点
设备树文件可能具有一个别名节点(/aliases),该节点定义一个或多个别名属性。别名节点应位于设备树的根节点,并且具有节点名称/别名。/aliases节点的每个属性都定义了一个别名。属性名称指定别名。属性值指定设备树中节点的完整路径。例如,属性serial0 = "/simple-bus@fe000000/serial@llc500"定义了别名serial0。别名的命名规则如下:

1.3.4.3. /memory节点
所有设备树都需要内存设备节点,并描述系统的物理内存布局。如果系统具有多个范围的内存,则可以创建多个内存节点,或者可以在单个内存节点的reg属性中指定范围。
/memory节点的属性要求如下:
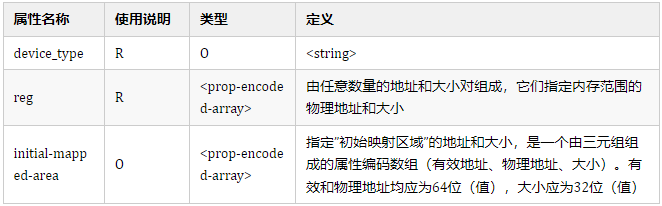
在xxx.dts中
memory?{
reg?=??<0x40000000?0x10000000>;???起始地址0x40000000?长度0x10000000(32MB)
};
1.3.4.4. /chosen 节点
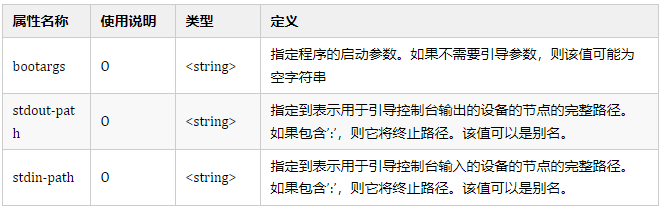
示例:
chosen?{
bootargs?=?"root=/dev/nfs?rw?nfsroot=192.168.1.1?console=ttyS0,115200";
};
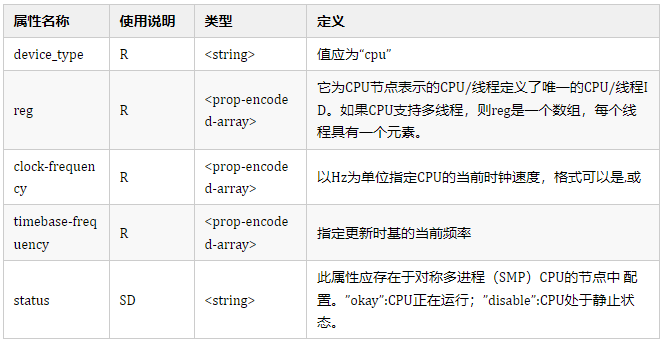
1.3.4.5. /cpus节点属性
所有设备树均需要/cpus/cpu节点。它并不代表系统中的真实设备,而是作为代表系统cpu的子cpu节点的容器。
1.3.5. 中断映射
在设备树中,存在逻辑中断树,该逻辑中断树表示平台硬件中断的层次结构和路由。在设备树中,使用interrupt-parent属性表示中断源与中断控制器的物理连线。代表产生中断的设备节点包含一个中断父属性,该属性具有一个虚拟值,指向给设备的中断所路由到的设备(通常是中断控制器)。
如果产生中断的设备不具有中断父属性,则假定其中断父节点为其设备父节点。每个中断产生设备都包含一个中断属性,该属性的值描述该设备的一个或多个中断源。每个源都用称为中断描述符表示。中断描述符的格式和含义是特定于中断域的,即,取决于中断域根节点上节点的属性。中断域的根使用#interrupt-cells属性定义对中断描述符进行编码所需的值数量。
中断域是解释中断描述符的上下文。中断域的根可以是中断控制器(interrupt controller)或中断连接器(interrupt nexus):
- 中断控制器是物理设备,需要一个驱动程序来处理通过它路由的中断。它还可能级联到另一个中断域。中断控制器由设备树中该节点上的interrupt-controller指定。
- 中断连接器定义了一个中断域和另一个中断域之间的转换。翻译基于特定领域和总线的信息。使用interrupt-map属性在域之间进行转换。例如,PCI控制器设备节点可以是一个中断连接器,定义从PCI中断命名空间(INTA、INTB等)到具有中断请求(IRQ)编号的中断控制器的转换。

1.3.5.1. Interrupts

示例:
interrupts?=?<GIC_SPI?INT_DMA?IRQ_TYPE_LEVEL_HIGH>;
1.3.5.2. interrupt-paren
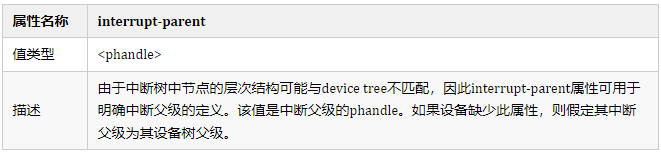
示例:
interrupt-parent?=?<&gpe>;
1.3.5.3. interrupts-extended

示例:
interrupts-extended?=?<&pic?0xA?8>,?<&gic?0xda>;
1.3.5.4. #interrupt-cells

1.3.5.5. interrupt-controller

1.4.Device Tree binary格式
Devicetree Blob (DTB)格式是Devicetree数据的平面二进制编码。它用来在软件程序之间交换设备数据。例如,在引导操作系统时,固件将向操作系统内核传递一个DTB。
DTB格式将devicetree数据编码为一个单一的、线性的、无指针的数据结构。它由一个小标题组成,接下来是三个大小可变的部分:内存保留块、结构块和字符串块这些应该按照这个顺序出现在扁平的devicetree中。
因此。当按地址加载到内存中时,设备树结构作为一个整体。将类似于图中的图表。
1.4.1. dt_header
设备树的头部是由以下C结构体定义的。所有字段都是32位整数,以big-endian格式存储。
struct?fdt_header?{
此字段应包含值0xd00dfeed(big-endian)
uint32_t?magic;????/*?magic?word?FDT_MAGIC?*/
此字段应包含设备数据结构的总大小(字节)。该大小应包含结构的所有部分:报头、内存预留块、结构块和字符串块,以及块之间或最终块之后的自由空间间隙。
uint32_t?totalsize;???/*?total?size?of?DT?block?*/
此字段应包含结构块从标题开始的字节偏移
uint32_t?off_dt_struct;???/*?offset?to?structure?*/
此字段应包含从标题开始的字符串块的字节偏移量
uint32_t?off_dt_strings;??/*?offset?to?strings?*/
此字段应包含从标题开始的内存保留块的字节偏移量
uint32_t?off_mem_rsvmap;??/*?offset?to?memory?reserve?map?*/
此字段应包含设备数据结构的版本
uint32_t?version;???/*?format?version?*/
此字段应包含设备所用版本向后兼容的最低版本数据结构
uint32_t?last_comp_version;??/*?last?compatible?version?*/
/*?version?2?fields?below?*/
此字段应包含系统引导CPU的物理ID。它应与设备树中CPU节点的reg属性中给定的物理ID相同
uint32_t?boot_cpuid_phys;??/*?Which?physical?CPU?id?we're?booting?on?*/
/*?version?3?fields?below?*/
此字段应包含字符串块部分的字节长度
uint32_t?size_dt_strings;??/*?size?of?the?strings?block?*/
/*?version?17?fields?below?*/
此字段应包含结构块部分的字节长度
uint32_t?size_dt_struct;??/*?size?of?the?structure?block?*/
};
1.4.2. memory reservation block
内存保留块向客户端程序提供物理内存中被保留的区域的列表,这些内存不用于一般的内存分配,目的是保护重要的数据结构不被客户端程序覆盖。这个区域包括了若干的reserve memory描述符。每个reserve memory描述符是由address和size组成。其中address和size都是用U64来描述:
struct?fdt_reserve_entry?{
uint64_t?address;
uint64_t?size;
};
1.4.3. Structure block
结构块描述了设备树本身的结构和内容。它由若干的分片组成,每个分片开始位置都是保存了令牌(token),以此来描述该分片的属性和内容。
- FDT_BEGIN_NODE (0x00000001):该token描述了一个node的开始位置,紧挨着该token的就是node name(包括unit address)
- FDT_END_NODE (0x00000002):该token描述了一个node的结束位置
- FDT_PROP (0x00000003):该token描述了一个property的开始位置,该token之后是两个u32的数据。它们之后就是长度为len的具体的属性值数据。
struct?{
uint32_t?len;?表示该property value data的size。
uint32_t?nameoff;?表示该属性字符串在device?tree?strings?block的偏移值
}
- FDT_NOP (0x00000004):被解析设备树的程序忽略,可用于覆盖其他属性,以删除它
- FDT_END (0x00000009):标记结构块的结束所以,一个DTB的结构块可能如下:
(optionally)?any?number?of?FDT_NOP?tokens
FDT_BEGIN_NODE?token:
--node’s?name
--paddings
For?each?property?of?the?node:
--FDT_NOP(optionally)
--FDT_PROP?token
--property
all?child?nodes?in?this?format
(optionally)?any?number?of?FDT_NOP?tokens
FDT_END_NODE?token
1.4.4. Strings Block
定义了各个node中使用的属性的字符串表。由于很多属性会出现在多个node中,因此,所有的
属性字符串组成了一个string block。这样可以压缩DTB的size。
1.5.Linux解析设备树
设备树描述了设备的详细信息,这些信息包括数字类型的、字符串类型的、数组类型的,我们在编写驱动时需要去获取这些信息。Linux内核提供一系列以of_开头的函数来获取设备树信息,这些函数的原型都定义在include/linux/of.h中。设备以节点的形式挂在设备树上,Linux内核使用device_node结构体来描述一个节点,其定义在include/linux/of.h中:
struct?device_node?{
const?char?*name;?????device?node?name
const?char?*type;?????对应device_type的属性
phandle?phandle;??????对应该节点的phandle属性
const?char?*full_name;??从“/”开始的,表示该node的full?path
Struct??property?*properties;??????该节点的属性列表
如果需要删除某些属性,kernel并非真的删除,而是挂入到deadprops的列表
struct??property?*deadprops;?/*?removed?properties?*/
parent、child以及sibling将所有的device?node连接起来
Struct??device_node?*parent;
Struct??device_node?*child;
Struct??device_node?*sibling;
通过该指针可以获取相同类型的下一个node
Struct??device_node?*next;?/*?next?device?of?same?type?*/
通过该指针可以获取node?global?list下一个node
struct??device_node?*allnext;?/*?next?in?list?of?all?nodes?*/
struct??kobject?kobj;
unsigned?long?_flags;
void?*data;
#if?defined(CONFIG_SPARC)
const?char?*path_component_name;
unsigned?int?unique_id;
struct?of_irq_controller?*irq_trans;
#endif
};
1.5.1. 查找节点的 OF函数
1.5.1.1. of_find_node_by_name
功能 :Find a node by its "name" property函数
struct?device_node?*of_find_node_by_name(struct?device_node?*from,
const?char?*name)
参数 :
@from:开始查找的节点,如果为NULL表示从根节点开始查找整个设备树。
@name::要查找的节点名字。
返回值:找到的节点,如果为NULL表示查找失败。
1.5.1.2. of_find_node_by_path
功能 :Find a node matching a full OF path函数 :
struct?device_node?*of_find_node_by_path(const?char?*path)
参数 :
@path: 完整的匹配路径
返回值 :找到的节点,如果为NULL表示查找失败。
1.5.1.3. of_find_node_by_type
功能Find a node by its "device_type" property函数
struct?device_node?*of_find_node_by_type(struct?device_node?*from,
const?char?*type)
参数
@from:开始查找的节点,如果为NULL表示从根节点开始查找整个设备树
@type:?要查找的节点类型
返回值找到的节点,如果为NULL表示查找失败。
1.5.1.4. of_find_compatible_node
功能通过device_type和compatible查找指定节点函数
struct?device_node?*of_find_compatible_node(struct?device_node?*from,const?char?*type,?const?char?*compatible)
参数
@from:开始查找的节点,如果为NULL表示从根节点开始查找整个设备树
@type:?要查找的节点device_type属性
@compatible:节点的compatible属性列表
返回值找到的节点,如果为NULL表示查找失败。
1.5.1.5. of_find_node_with_property
功能通过属性名查找指定节点函数
struct?device_node?*of_find_node_with_property(struct?device_node?*from,const?char?*prop_name)
参数
@from:开始查找的节点,如果为NULL表示从根节点开始查找整个设备树
@type:?要查找的节点属性名称
返回值找到的节点,如果为NULL表示查找失败。
1.5.2. 查找父 /子节点的 OF函数
1.5.2.1. of_get_parent
功能函数用于获取指定节点的父节点(如果有父节点的话 )函数
struct?device_node?*of_get_parent(const?struct?device_node?*node)
参数
@node:要查找父节点的节点
返回值找到的父节点
1.5.2.2. of_get_next_available_child
功能 获取子节点,并跳过status = "disabled"的节点函数
struct?device_node?*of_get_next_available_child(const?struct?device_node?*node,struct?device_node?*prev)
参数
@node:?父节点
@prev:当前父节点的上一个子节点,?如果为空,则获取第一个子节点
返回值找到的子节点
1.5.3. 提取属性值的 OF函数
Linux内核使用struct property来保存节点的属性,其定义在/include/linux/of.h中:
struct?property?{
char??*name;??????属性的名称
int??length;??????属性的长度
void??*value;?????属性的值
struct?property?*next;???下一个属性
unsigned?long?_flags;
unsigned?int?unique_id;
struct?bin_attribute?attr;
};
1.5.3.1. of_find_property
功能寻找指定的属性函数
struct?property?*of_find_property(const?struct?device_node?*np,
const?char?*name,
int?*lenp)
参数
@np:?设备节点
@name:属性名称
@lenp:属性的字节数
返回值找到的属性
1.5.3.2. 读取属性中u8、u16、u32和u64类型的数组数据
当设置sz为1时,就是读取一个数据,Linux内核也是这么封装的。
int?of_property_read_u8_array(const?struct?device_node?*np,
const?char?*propname,?u8?*out_values,?size_t?sz)
int?of_property_read_u16_array(const?struct?device_node?*np,
const?char?*propname,?u16?*out_values,?size_t?sz)
int?of_property_read_u32_array(const?struct?device_node?*np,
const?char?*propname,?u32?*out_values,size_t?sz)
int?of_property_read_u64(const?struct?device_node?*np,?const?char?*propname,
u64?*out_value)
1.5.3.3. of_property_read_string
功能找到并读取属性字符串函数
int?of_property_read_string(struct?device_node?*np,?const?char?*propname,const?char?**out_string)
参数
@np:?设备节点
@propname:属性名称
@out_string:读取的字符串
返回值
0:读取成功
-EINVAL:属性不存在
-ENODATA:属性没有这个值
-EILSEQ:字符串不是以空字符’’结尾
2. 设备树解析流程
2.1.内核启动并获取设备树
在uboot引导内核的时候,会将设备树在物理内存中的物理起始内存地址传递给Linux内核,然后Linux内核在unflattern_device_tree中解析设备镜像,并利用扫描到的信息创建由device node构成的链表,全局变量of_allnodes指向链表的根节点,设备树的每一个节点都由一个struct device_node与之对应。
unflatten_device_tree的意思是解开设备树,在这个函数里调用了__unflatten_device_tree这一函数:
/**
*?__unflatten_device_tree?-?create?tree?of?device_nodes?from?flat?blob
*
*?unflattens?a?device-tree,?creating?the
*?tree?of?struct?device_node.?It?also?fills?the?"name"?and?"type"
*?pointers?of?the?nodes?so?the?normal?device-tree?walking?functions
*?can?be?used.
*?@blob:?The?blob?to?expand
*?@mynodes:?The?device_node?tree?created?by?the?call
*?@dt_alloc:?An?allocator?that?provides?a?virtual?address?to?memory
*?for?the?resulting?tree
*/
static?void?__unflatten_device_tree(struct?boot_param_header?*blob,
struct?device_node?**mynodes,
void?*?(*dt_alloc)(u64?size,?u64?align))
所以,现在为止,我们得到了一个名为of_allnodes的struct *device_node,它指向了设备树展开后的device_node树,后续的操作都是基于device_node树。
2.2.创建platform_device
内核从启动到创建设备的过程大致如下:在do_initcalls中会传递level给do_initcall_level来调用不同层次的初始化函数,level的对应关系见linux-3.10/include/linux/init.h 第196行。在这个初始化过程中,会调用一个customize_machine的函数。
2.3.Platform driver
注册流程此节分析Platform driver的注册流程,以memctrl驱动的注册为例分析。关于系统调用驱动初始化函数的流程分析,参考自动初始化机制章节。本章节分析从设备驱动文件的xxx_init函数开始分析。
2.3.1. struct platform_driver
platform_driver是在device_driver之上的一层封装,其结构如下:
struct?platform_driver?{
int?(*probe)(struct?platform_device?*);???探测函数
int?(*remove)(struct?platform_device?*);??驱动卸载时执行
void?(*shutdown)(struct?platform_device?*);??关机时执行函数
int?(*suspend)(struct?platform_device?*,?pm_message_t?state);??挂起函数
int?(*resume)(struct?platform_device?*);?????恢复函数
struct?device_driver?driver;???????????管理的driver对象
const?struct?platform_device_id?*id_table;???匹配时使用
};
2.3.2. struct device_driver
struct device_driver是系统提供的基本驱动结构:struct?device_driver?{
const?char???*name;??驱动名称
struct?bus_type???*bus;?所属总线
struct?module???*owner;?模块拥有者
const?char???*mod_name;?内建的模块使用
bool?suppress_bind_attrs;??是否绑定到sysfs
const?struct?of_device_id??*of_match_table;?设备树匹配表
const?struct?acpi_device_id??*acpi_match_table;?ACPI匹配表
int?(*probe)?(struct?device?*dev);??探测设备
int?(*remove)?(struct?device?*dev);?与设备脱离时调用
void?(*shutdown)?(struct?device?*dev);?在关机时关闭设备
int?(*suspend)?(struct?device?*dev,?pm_message_t?state);?使设备进入睡眠模式调用
int?(*resume)?(struct?device?*dev);??唤醒设备时调用
const?struct?attribute_group?**groups;?自动创建的默认属性组
const?struct?dev_pm_ops?*pm;??设备的功耗管理
struct?driver_private?*p;?驱动的私有数据
};
2.3.3. platform_driver_register
Platform_driver的注册接口是platform_driver_register,其定义如下:
int?platform_driver_register(struct?platform_driver?*drv)
{
drv->driver.bus?=?&platform_bus_type;??设置总线类型
if?(drv->probe)????确认定义了probe函数
drv->driver.probe?=?platform_drv_probe;??里面实际调用的是drv的probe函数
if?(drv->remove)
drv->driver.remove?=?platform_drv_remove;
if?(drv->shutdown)
drv->driver.shutdown?=?platform_drv_shutdown;
return?driver_register(&drv->driver);
}
platform_driver_register接口是为注册总线驱动做一些准备工作,定义了总线类型,设置了driver的部分接口,最后driver_register会向总线注册驱动
2.3.4. driver_register
int?driver_register(struct?device_driver?*drv)
{
int?ret;
struct?device_driver?*other;
BUG_ON(!drv->bus->p);
if?((drv->bus->probe?&&?drv->probe)?||
(drv->bus->remove?&&?drv->remove)?||
(drv->bus->shutdown?&&?drv->shutdown))
printk(KERN_WARNING?"Driver?'%s'?needs?updating?-?please?use?"
"bus_type?methodsn",?drv->name);
other?=?driver_find(drv->name,?drv->bus);?检查驱动是否已经注册
if?(other)?{
printk(KERN_ERR?"Error:?Driver?'%s'?is?already?registered,?"
"aborting...n",?drv->name);
return?-EBUSY;
}
ret?=?bus_add_driver(drv);???driver_register的主要工作放在了这里
if?(ret)
return?ret;
ret?=?driver_add_groups(drv,?drv->groups);?主要是在sysfs添加驱动属性
if?(ret)?{
bus_remove_driver(drv);
return?ret;
}
kobject_uevent(&drv->p->kobj,?KOBJ_ADD);???涉及到uevent,暂时不分析
return?ret;
}
2.3.5. bus_add_driver
由以上分析可知,驱动的注册,重点在bus_add_driver()函数,它会向总线添加驱动:
Drivers/base/bus.c
int?bus_add_driver(struct?device_driver?*drv)
{
struct?bus_type?*bus;
struct?driver_private?*priv;??包含与驱动相关的kobject和klist结构
int?error?=?0;
bus?=?bus_get(drv->bus);??获取设备所属的总线类型
if?(!bus)
return?-EINVAL;
pr_debug("bus:?'%s':?add?driver?%sn",?bus->name,?drv->name);
priv?=?kzalloc(sizeof(*priv),?GFP_KERNEL);
if?(!priv)?{
error?=?-ENOMEM;
goto?out_put_bus;
}
klist_init(&priv->klist_devices,?NULL,?NULL);
priv->driver?=?drv;
drv->p?=?priv;
priv->kobj.kset?=?bus->p->drivers_kset;
error?=?kobject_init_and_add(&priv->kobj,?&driver_ktype,?NULL,
"%s",?drv->name);
if?(error)
goto?out_unregister;
klist_add_tail(&priv->knode_bus,?&bus->p->klist_drivers);
if?(drv->bus->p->drivers_autoprobe)?{?如果设置了自动探测
error?=?driver_attach(drv);
if?(error)
goto?out_unregister;
}
module_add_driver(drv->owner,?drv);
error?=?driver_create_file(drv,?&driver_attr_uevent);
if?(error)?{
printk(KERN_ERR?"%s:?uevent?attr?(%s)?failedn",
__func__,?drv->name);
}
error?=?driver_add_attrs(bus,?drv);
if?(error)?{
/*?How?the?hell?do?we?get?out?of?this?pickle??Give?up?*/
printk(KERN_ERR?"%s:?driver_add_attrs(%s)?failedn",
__func__,?drv->name);
}
if?(!drv->suppress_bind_attrs)?{
error?=?add_bind_files(drv);
if?(error)?{
/*?Ditto?*/
printk(KERN_ERR?"%s:?add_bind_files(%s)?failedn",
__func__,?drv->name);
}
}
return?0;
out_unregister:
kobject_put(&priv->kobj);
kfree(drv->p);
drv->p?=?NULL;
out_put_bus:
bus_put(bus);
return?error;
}
2.3.6. driver_attach
driver_attach会尝试绑定设备和驱动。编译总线上的所有设备,然驱动挨个尝试匹配,如果driver_probe_device()返回0且@dev->driver被设置,就代表找到了一对兼容的设备驱动。
int?driver_attach(struct?device_driver?*drv)
{
return?bus_for_each_dev(drv->bus,?NULL,?drv,?__driver_attach);
}
EXPORT_SYMBOL_GPL(driver_attach);
2.3.7. __driver_attach
对于每一个总线的设备,driver_attach都会调用__driver_attach来尝试与驱动匹配。static?int?__driver_attach(struct?device?*dev,?void?*data)
{
struct?device_driver?*drv?=?data;
/*
*?Lock?device?and?try?to?bind?to?it.?We?drop?the?error
*?here?and?always?return?0,?because?we?need?to?keep?trying
*?to?bind?to?devices?and?some?drivers?will?return?an?error
*?simply?if?it?didn't?support?the?device.
*
*?driver_probe_device()?will?spit?a?warning?if?there
*?is?an?error.
*/
if?(!driver_match_device(drv,?dev))??匹配设备和驱动,这里调用的是platform_match
return?0;
if?(dev->parent)?/*?Needed?for?USB?*/
device_lock(dev->parent);
device_lock(dev);??设置互斥锁,防止其他进程访问设备资源
if?(!dev->driver)
如果设备没有驱动,则为设备探测驱动,这个函数与注册设备调用的是同一个函数
driver_probe_device(drv,?dev);
device_unlock(dev);
if?(dev->parent)
device_unlock(dev->parent);
return?0;
}
driver_probe_device里调用really_probe函数,并在really_probe中调用驱动文件中的probe函数,对于memctrl驱动而言,就是xxxx_memctrl_probe函数。至此,platfprm driver就注册好了。
2.4.Platform Bus的匹配原则
由以上的代码分析得知,注册platform device时,会调用__device_attach -> driver_match_device,注册platform driver时,会调用__driver_attach -> driver_match_device,也就是说设备和驱动都会调用到这个函数:
static?inline?int?driver_match_device(struct?device_driver?*drv,
struct?device?*dev)
{
return?drv->bus->match???drv->bus->match(dev,?drv)?:?1;
}
drv->bus->match,这是驱动绑定的总线提供的匹配函数,这里注册的是platform总线设备,而platform总线的定义参考3.2.6 platform_bus_type。Platform对应的match函数为:platform_match:
static?int?platform_match(struct?device?*dev,?struct?device_driver?*drv)
{
struct?platform_device?*pdev?=?to_platform_device(dev);
struct?platform_driver?*pdrv?=?to_platform_driver(drv);
/*?Attempt?an?OF?style?match?first?*/
if?(of_driver_match_device(dev,?drv))
return?1;
/*?Then?try?ACPI?style?match?*/
if?(acpi_driver_match_device(dev,?drv))
return?1;
/*?Then?try?to?match?against?the?id?table?*/
if?(pdrv->id_table)
return?platform_match_id(pdrv->id_table,?pdev)?!=?NULL;
/*?fall-back?to?driver?name?match?*/
return?(strcmp(pdev->name,?drv->name)?==?0);
}
2.4.1. of_driver_match_device
根据驱动的of_match_table判断是否有驱动与之匹配。对memctrl驱动而言,其of_match_table如下:
static?struct?of_device_id?xxxx_memctrl_of_match[]?=?{
{?.compatible?=?"xxxx,memctrl",?},
{},
};
of_driver_match_device的执行流程如下:
所以重点应该在__of_match_node函数:
2.4.1.1. __of_match_node
static?const?struct?of_device_id?*__of_match_node(const?struct?of_device_id?*matches,?const?struct?device_node?*node)
{
if?(!matches)
return?NULL;
while?(matches->name[0]?||?matches->type[0]?||?matches->compatible[0])?{
int?match?=?1;
if?(matches->name[0])???查找名字
match?&=?node->name?&&?!strcmp(matches->name,?node->name);
if?(matches->type[0])???查找类型
match?&=?node->type?&&?!strcmp(matches->type,?node->type);
if?(matches->compatible[0])??查找属性,检测节点的compatible是否与驱动的一致
match?&=?__of_device_is_compatible(node,?matches->compatible);
if?(match)
return?matches;
matches++;
}
return?NULL;
}
3. 使用设备资源
4. 自动初始化机制
4.1.编译到内核
4.1.1. module_init宏展开
Linux中每一个模块都有一个module_init函数,并且有且只有一个,其定义如下:
/**
*?module_init()?-?driver?initialization?entry?point
*?@x:?function?to?be?run?at?kernel?boot?time?or?module?insertion
*
*?module_init()?will?either?be?called?during?do_initcalls()?(if
*?builtin)?or?at?module?insertion?time?(if?a?module).??There?can?only
*?be?one?per?module.
*/
#define?module_init(x)?__initcall(x);
__initcall(x)定义如下:
#define?__initcall(fn)?device_initcall(fn)
device_initcall(fn)定义如下:
#define?device_initcall(fn)???????__define_initcall(fn,?6)
__define_initcall的定义如下:
/*?initcalls?are?now?grouped?by?functionality?into?separate
*?subsections.?Ordering?inside?the?subsections?is?determined
*?by?link?order.
*?For?backwards?compatibility,?initcall()?puts?the?call?in
*?the?device?init?subsection.
*
*?The?`id'?arg?to?__define_initcall()?is?needed?so?that?multiple?initcalls
*?can?point?at?the?same?handler?without?causing?duplicate-symbol?build?errors.
*/
#define?__define_initcall(fn,?id)
static?initcall_t?__initcall_##fn##id?__used
__attribute__((__section__(".initcall"?#id?".init")))?=?fn
Initcalls现在按照功能分组到单独的子部分。子部分内部的顺序由链接顺序决定。为了向后兼容,initcall()将调用放到device init小节中。需要定义initcall()的’id’参数,以便多个initcall可以指向同一个处理程序,而不会导致重复符号构建错误。若不理解上述代码的用法,可以参考__attribute__的section用法和C语言宏定义中#和##的用法。所以将__define_initcall展开将会是下面的内容:
假设__define_initcall(led_init,?6)
Static?initcall_t?__initcall_led_init6?__used
__attribute__((__section__(".initcall6.init")))?=?led_init
即是定义了一个类型为initcall_t的函数指针变量__initcall_led_init6,并赋值为led_init,该变量在链接时会链接到section(.initcall6.init)。
4.1.2. 链接脚本
在linux3.10/arch/arm/kernel/vmlinux.lds.S中:
......
SECTIONS??/*?line?54?*/
{
......
.init.data?:?{?/*?line?202?*/
#ifndef?CONFIG_XIP_KERNEL
INIT_DATA
#endif
INIT_SETUP(16)
INIT_CALLS
CON_INITCALL
SECURITY_INITCALL
INIT_RAM_FS
}
......
}
在linux3.10/include/asm-generic/vmlinux.lds.h中:
#define?VMLINUX_SYMBOL(x)?__VMLINUX_SYMBOL(x)
#define?__VMLINUX_SYMBOL(x)?x
......?/*?line?664?*/
#define?INIT_CALLS_LEVEL(level)
VMLINUX_SYMBOL(__initcall##level##_start)?=?.;
*(.initcall##level##.init)
*(.initcall##level##s.init)
#define?INIT_CALLS
VMLINUX_SYMBOL(__initcall_start)?=?.;
*(.initcallearly.init)
INIT_CALLS_LEVEL(0)
INIT_CALLS_LEVEL(1)
INIT_CALLS_LEVEL(2)
INIT_CALLS_LEVEL(3)
INIT_CALLS_LEVEL(4)
INIT_CALLS_LEVEL(5)
INIT_CALLS_LEVEL(rootfs)
INIT_CALLS_LEVEL(6)
INIT_CALLS_LEVEL(7)
VMLINUX_SYMBOL(__initcall_end)?=?.;
......
所以 INIT_CALLS_LEVEL(6)会展开为:
__initcall6_start?=?.;??*(.initcall6.init)???*(.initcall6s.init)
所以__initcall_led_init6会链接到
section(.initcall6.init)
4.1.3. 初始化
内核启动流程为:
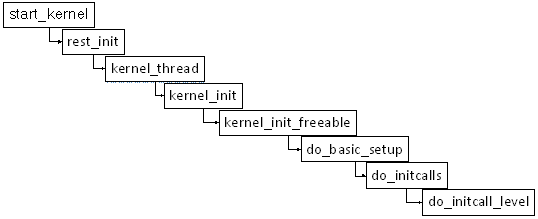
do_initcall_level的主要内容如下:
/*?linux3.10/init/main.c?line?744?*/
static?void?__init?do_initcall_level(int?level)
{
.....
for?(fn?=?initcall_levels[level];?fn?<?initcall_levels[level+1];?fn++)
do_one_initcall(*fn);
}
由代码可知,内核会依次调用level段存储的初始化函数。比如对于模块来说level等于6。
4.2.动态加载的模块(.ko)
4.2.1. Module_init展开
如果设置为编译成动态加载的模块(.ko),module_init的展开形式与编译到内核不一样。
/*?Each?module?must?use?one?module_init().?*/
#define?module_init(initfn)
static?inline?initcall_t?__inittest(void)?????检查定义的函数是否符合initcall_t类型
{?return?initfn;?}
int?init_module(void)?__attribute__((alias(#initfn)));
alias属性是GCC的特有属性,将定义init_module为函数initfn的别名,所以module_init(initfn)的作用就是定义一个变量名 init_module,其地址和initfn是一样的。
4.2.2. *mod.c文件
编译成module的模块都会自动产生一个*.mod.c的文件,例如:
struct?module?__this_module
__attribute__((section(".gnu.linkonce.this_module")))?=?{
.name?=?KBUILD_MODNAME,
.init?=?init_module,
#ifdef?CONFIG_MODULE_UNLOAD
.exit?=?cleanup_module,
#endif
.arch?=?MODULE_ARCH_INIT,
};
即定义了一个类型为module的全局变量__this_module,其成员.init就是上文由module_init定义的init_module变量。并且__this_module会被链接到
section(".gnu.linkonce.this_module")。
4.2.3. 动态加载
insmod是busybox提供的用户层命令:路径busybox/modutils/ insmod.c
insmod_main
bb_init_module
init_module
路径busybox/modutils/modutils.c:
#define?init_module(mod,?len,?opts)?.
syscall(__NR_init_module,?mod,?len,?opts)该系统调用对应内核层的sys_init_module函数
路径:kernel/module.c
SYSCALL_DEFINE3(init_module,…)
//加载模块的ko文件,并解释各个section,重定位
mod?=?load_module(umod,?len,?uargs);
//查找section(".gnu.linkonce.this_module")
modindex?=?find_sec(hdr,?sechdrs,?secstrings,".gnu.linkonce.this_module");
//找到Hello_module.mod.c定义的module数据结构
mod?=?(void?*)sechdrs[modindex].sh_addr;
if?(mod->init?!=?NULL)
ret?=?do_one_initcall(mod->init);?//调用initfn.
4.3.__attribute__的section用法
__define_initcall使用了gcc的 __attribute__众多属性中的section子项,其使用方式为:
__attribute__((__section__("section_name")))
其作用是将作用的函数或数据放入指定的名为”section_name”的段。
4.4. C语言宏定义中#和##的用法
4.4.1. 一般用法
我们使用#把宏参数变为一个字符串。
#define?PRINT(FORMAT,VALUE)
printf("The?value?of"#VALUE"is?"?FORMAT"n",VALUE)
调用:printf("%d",x+3); ? ? --> ? ? 打印:The value of x+3 is 20
这是因为”The value of”#VALUE”is ” FORMAT”n”实际上是包含了”The value of “,#VALUE,”is “,FORMAT,”n” 五部分字符串,其中VALUE和FORMAT被宏参数的实际值替换了。
用##把两个宏参数贴合在一起
#define?ADD_TO_SUM(sum_number,val)?sum##sum_bumber+=(val)
调用:ADD_TO_SUM(2,100); ? ? --> ? ? 打印:sum2+=(100)
需要注意的是凡宏定义里有用'#'或'##'的地方宏参数是不会再展开。
4.4.2. '#'和'##'的一些应用特例
合并匿名变量名
#define??___ANONYMOUS1(type,?var,?line)??type??var##line
#define??__ANONYMOUS0(type,?line)??___ANONYMOUS1(type,?_anonymous,?line)
#define??ANONYMOUS(type)??__ANONYMOUS0(type,?__LINE__)
例:ANONYMOUS(static int); ?即 static int _anonymous70; ?70表示该行行号;第一层:ANONYMOUS(static int); --> ?__ANONYMOUS0(static int, LINE);
第二层:? ? ? ? ? ? ? ? ? ? ? ? ? ?--> ?___ANONYMOUS1(static int, _anonymous, 70);
第三层:? ? ? ? ? ? ? ? ? ? ? ? ? ?--> ?static int ?_anonymous70;
即每次只能解开当前层的宏,所以__LINE__在第二层才能被解开;
填充结构
#define??FILL(a)???{a,?#a}
enum?IDD{OPEN,?CLOSE};
typedef?struct?MSG{
IDD?id;
const?char??msg;
}MSG;
MSG?_msg[]?=?{FILL(OPEN),?FILL(CLOSE)};
相当于:
MSG?_msg[]?=?{{OPEN,?OPEN},
{CLOSE,?CLOSE}};
记录文件名
#define??_GET_FILE_NAME(f)???#f
#define??GET_FILE_NAME(f)????_GET_FILE_NAME(f)
static?char??FILE_NAME[]?=?GET_FILE_NAME(__FILE__);
得到一个数值类型所对应的字符串缓冲大小
#define??_TYPE_BUF_SIZE(type)??sizeof?#type
#define??TYPE_BUF_SIZE(type)???_TYPE_BUF_SIZE(type)
char??buf[TYPE_BUF_SIZE(INT_MAX)];
--??char??buf[_TYPE_BUF_SIZE(0x7fffffff)];
--??char??buf[sizeof?0x7fffffff];
这里相当于:
char??buf[11];


